Sunday, November 27, 2011

Oh my gosh Ganache!!

This cake was inspired by an amazing local baker, Stir Crazy Baked Goods! If you are in the area, you have to stop by Avoca Coffee and taste some of her unique and delicious items, you will not be disappointed. I made this cake for my husband's family Thanksgiving and they loved it. It was one of my prettiest cakes so far. At first no one wanted to cut into it, but after the first slice was cut it seemed to disappear fast! I hope you enjoy this cake as much as we did.

Chocolate Chip Cake with Buttercream Icing AND
a Chocolate Ganache Topping


Cake: 
1 box of butter golden cake mix
1 pkg vanilla pudding mix
1 c milk
1/3c unsalted butter, softened
3 eggs
1 c milk chocolate chips

To make the Cake: Preheat oven to 350. Mix all cake ingredients together until smooth and creamy. Fold in chocolate chips. Pour into two 9" round cake pans. Bake for approx 25mins, until a toothpick comes out clean when inserted in the center. Let stand for 10 mins to cool.

Icing: 
2 sticks butter, softened
1 stick shortening
2tsp vanilla
8 c powdered sugar
6-8 tblsp milk

To make the Icing: Cream the butter, shortening and vanilla together. Add in the powdered sugar one cup at a time, scraping sides with each addition. The mixture will be dry. Add in the milk a few tablespoons at a time until the icing is a creamy, spreadable consistency. Cover one cake, top and sides with about 1/3 of the icing. Then layer on the second cake on top and cover tops and sides with remainining icing.

Ganache: 
1 1/4 c semisweet chocolate chips
3/4 tblsp light corn syrup
3/4 c heavy cream

To make the Ganache topping: Place the chocolate chips and the corn syrup in a heatproof bowl, set aside. Bring the heavy cream to a full boil. Pour the cream over the chocolate mixture and whish together until smooth and all chocolate chips are melted. Pour the ganache over the top of the cake and smooth the top of the cake, allowing the ganache to spill over the sides. Refrigerate for at least 20 minutes before serving.


Chocolate-Filled Sweet Potato Cupcakes

I found this recipe in a Better Homes and Garden magazine and had to try it. Using sweet potatoes instead of oil and the combination of dark, semi-sweet and milk chocolate together was something I couldn't resist. I was very impressed with these cupcakes and my family enjoyed them too, I took them to my Thanksgiving Day feast. They were yummy spice cupcakes with a creamy chocolate icing, I placed an extra dark chocolate kiss on top, just for fun. My mom has already requested that I make these for Christmas!

Chocolate-Filled Sweet Potato Cupcakes


Cupcakes:
2 cups all purpose flour
2 tsp. pumpkin pie spice
1 1/2 tsp baking powder
1/2 tsp baking soda
1/4 tsp salt
1 cup (2 sticks) unsalted butter, at room temperature
1 1/2 cups white sugar
1 large sweet potato, cooked at 425 for 45-50 minutes until fork tender and cooled to room temperature
3 eggs
1/4 cup milk
1 tsp vanilla extract
24 chocolate kisses (I used dark chocolate kisses)
Steps: 
Preheat oven to 350 degrees. Line 24 muffin cups with paper liners.
Whisk together flour, baking powder, baking soda, pumpkin pie spice and salt in a medium bowl. Set aside. Peel baked sweet potato and mash it up in a small bowl. Set aside. 
Combine butter and sugar in mixer with flat beater attachment at medium speed until light and fluffy. Add eggs and beat again to combine. Add  milk, vanilla extract and sweet potato and beat again, scraping down the sides of the bowl to get everything fully incorporated. Add flour mixture and beat until just combined. Do not overmix. Spoon batter into muffin tins and place in the oven for 5 minutes. 
Place chocolate kiss in the middle of each cupcake and press down into the center. You want the kiss to be completely covered by the cupcake batter.


Bake cupcakes for another 15 minutes until a toothpick inserted in the center comes out clean. 
Let cupcakes cool completely on a wire rack before frosting.  
Frosting:
12 oz semisweet chocolate chips
1 cup minus 2 tbsp butter, at room temperature
1 cup powdered sugar
1/4 cup milk (optional)
Steps:
Melt chocolate in the top bowl of a double boiler. You can also melt the chocolate in the microwave by heating it up in 30 second increments until it is melted and smooth, stirring often. Stir until chocolate is completely melted,then pour chocolate into bowl of electric mixer to cool for 5-10 minutes. Beat chocolate with flat beater attachment of mixer for 30 seconds, then gradually add butter, one tbsp at a time until fully incorporated. Add powdered sugar and beat again until smooth and creamy. If frosting is too thick add milk, 1 tbsp at a time, until it is spreadable.
Pipe 2-3 tbsp frosting onto each cupcake, or smooth frosting onto cupcake with offset spatula. 


Cupcakes will stay fresh for 3-4 days when stored in the refrigerator. 
Makes 24 cupcakes. 

Sunday, November 20, 2011

A time to be thankful

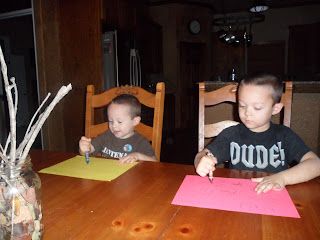
Thanksgiving is the time that we take a step back, take a look around, and stop to appreciate the things we have. It's a time of family, friends, food, and football! There are so many things to be thankful for- little things that we often times take for granted, the things we don't realize we have until they are gone, and the memories we create and share with one another. In the tradition of giving thanks, I decided to have the boys make a thankful tree. It was so much fun. I mean what boy isn't going to have fun running around the yard picking up rocks, leaves and big sticks!? Then we came inside and talked about the things we were thankful for and why we were thankful for them. The boys made sure that each family member and each friend was listed out, by name. I just thought that was so sweet and thoughtful, oh how I love these boys!

Thankful Tree

What you'll need: 
a mason jar
small rocks
leaves
big sticks
construction paper
markers/crayons
scissors

To Make:
Let your kids run around outside and pick up small rocks, leaves and big sticks for you. Gather all your items up and layer them in your mason jar. Put the rocks on bottom, then some leaves, then your sticks. Make sure you have long enough so that they hang over the top of the jar. 


Then let your kids color on some construction paper. If you have older kids you can have them write down the things they are thankful for on the paper instead of coloring. For the younger ones, just let them color to their hearts content. 

As we colored, we talked about the things we are thankful for. I wrote the words on the paper after the boys were finished, that way their artwork would be displayed on each leaf of our thankful tree. To make the leafs, cut out each word, cut a small hole at one side, and hang on the sticks of your tree. 


We talked about A LOT of things and people that we are thankful for. I decided, especially having younger boys and the fact that they were done running around and coloring so I was beginning to lose their interest, to only do a few leafs. We focused on the big things in life that we are thankful for everyday - Family, Friends, Love, Teachers, Home, Jesus, oh and of course Toys! 

What are you thankful for?

Friday, November 18, 2011

Yep! Another Pumpkin Recipe: Pumpkin Pasta

I'm sure you are all sick and tired of all these pumpkin recipes I've been posting, but I warned you, I'm in FULL Pumpkin mode and it will last until Thanksgiving! This pumpkin phase will last through Thanksgiving! I just love this time of year. I love the weather change, even though it usually means I get sick. I love the time off we are given from work to spend with our family. I love the time with my extended family. And I love all the wonderful food that is shared! This original recipe was for a side dish, but I decided to add some chicken and zucchini to make it an entree, you could make it either way. Without the chicken, it would be a great side to add to your Thanksgiving Day spread!

Chicken Penne with a Creamy Pumpkin Sauce


Recipe adapted from KraftFoods.com
What you'll need: 
1pkg boneless skinless chicken breast or tenders, cut into bite size pieces
2 zucchini, sliced
1 pkg (16oz) penne pasta
1 pkg (8oz) cream cheese
1/2c Parmesan cheese
1/2c (1 stick) butter
1/2c milk
1c canned pumpkin
1/2tsp ground red pepper (cayenne)
Ground nutmeg to taste

To Make: 
Cook pasta as directed on package. 
Meanwhile, cook the chicken pieces in a large skillet sprayed with cooking spray over medium-high heat for about 5 mins, then add in the sliced zucchini and cook an additional 5-7 mins. Add in the cream cheese, butter, Parmesan and milk and continue cooking until cheese is melted and chicken is cooked through. Stir in the pumpkin and seasonings, and cook until heated through, stirring occasionally. Drain pasta, add to chicken pumpkin mixture. Toss to coat. 

My whole family enjoyed this recipe. Here are some pics of the boys, showing you that at it ALL gone! 


Wednesday, November 16, 2011

Pumpkin Spiced Cream Cheese Breakfast Rolls

Another pumpkin post!? I know! I LOVE, absolutely LOVE pumpkin in the fall. And I will forewarn you, I LOVE peppermint in the winter! So be prepared. Until then, here's another yummy pumpkin recipe. 

Pumpkin Spiced Cream Cheese Breakfast Rolls


Ingredients for Rolls:  
2 (8-count cans) of Pillsbury Crescent Rolls (I used the Big & Flaky kind)
4 oz cream cheese, softened
1/4 Cup light brown sugar
1/4 Cup Pumpkin Butter or canned pumpkin

If you use the canned pumpkin, also add: 
1/4 teaspoon ground cinnamon
1/8 teaspoon fresh ground nutmeg


To Make Rolls: 
Preheat oven to 350 degrees F. On parchment or wax paper, unroll each can of crescent rolls to form 4 rectangles placed side by side. Pinch seams together to form one long rectangle. Place cream cheese, brown sugar, pumpkin, cinnamon and nutmeg into a mixer; beat until well combined. Spread mixture over your two crescent-roll rectangles, leaving a 1/2 inch border around edges. Starting at long end, roll up then cut into 1 inch pieces. Place on a sprayed cookie sheet, or in 2 9in round cake pans.
Bake for 30 minutes or until rolls are golden brown. Remove and let cool for 10 minutes. Frost warm rolls with cream cheese frosting recipe below.

Frosting:
4 oz softened cream cheese
1/2 Cup powdered sugar
1/2 teaspoon vanilla
1 Tablespoon Pumpkin Butter or canned pumpkin
 

To Make Frosting:
Mix all ingredients into a large bowl until smooth. Spread over warm rolls. Serve rolls warm.

Tuesday, November 15, 2011

Even More Pumpkin: Pumpkin Angel Food Cake with a Salted Caramel Glaze

I had a box of Angel Food Cake mix in my pantry and when I found this recipe I had to try it out! I, however, I am sticking to my no sweets til Thanksgiving challenge. So I made it, had my husband taste it, and I will be taking it to work tomorrow. My husband is very upset about that. He wanted to know when I was going to start baking us some good stuff. He'll be so happy come Thanksgiving when I will be baking for us again.


Pumpkin Angel Food Cake 


(Adapted from Betty Crocker)
1 box Betty Crocker white angel food cake mix
1 tbsp. Gold Medal all-purpose flour
1 tsp. cinnamon
¼ tsp. ginger
1/8 tsp. nutmeg
1/8 tsp. cloves
¾ cup canned pumpkin (not pumpkin pie filling)
1 cup cold water

Move oven rack to lowest position; heat oven to 350°F. In extra-large glass or metal bowl, beat all cake ingredients with electric mixer on low speed 30 seconds. Beat on medium speed 1 minute.
Pour into ungreased 10-inch angel food (tube) cake pan. Bake 37 to 47 minutes or until crust is dark golden brown and cracks are dry. Immediately turn pan upside down onto heatproof funnel or glass bottle. Let hang about 2 hours or until cake is completely cool. Loosen cake from side of pan with knife or long metal spatula. Turn cake upside down onto serving plate.
I acutally baked mine in a 13x9 pan for 35 minutes. I poked holes in the top, allowed it to cool for 10 mins and then poured the glaze over the top.

Salted Caramel Glaze 
¼ cup butter, salted
¼ cup dark brown sugar
¼ cup granulated sugar
½ cup whipping cream
¼  tsp. sea salt
2tsp. cinnamon

In heavy small saucepan melt 1/4 cup unsalted butter over medium-low heat. Stir in 1/4 cup packed brown sugar and 1/4 cup granulated sugar. Bring to boiling, stirring constantly.
Add 1/2 cup whipping cream and return to boiling. Boil for 2 minutes, stirring constantly. Remove from heat; stir in 1/4 to 3/4 tsp. sea salt and cinnamon. Cool completely.

More Pumpkin! This time it's Waffles!

We are always in such a rush on the weekday mornings that we like to take things a little slower on the weekends. We had a very special guest for breakfast this past Sunday morning, Grannie (my mom). I think the best way to start the day is with family and a good meal, and it was. These are sure to please your family and guests too.

Pumpkin Waffles


2 cups flour
2 tablespoons baking powder
1 tablespoon cinnamon
1 tablespoon sugar
½ teaspoon nutmeg
¼ teaspoon salt
4 eggs (separate yolks from the whites)
1 ½ cup milk
1 cup Pumpkin Butter
¾ cup (12 tablespoons) butter, melted
1 tablespoon vanilla

Directions: 
In a large bowl, combine flour, baking powder, cinnamon, sugar, nutmeg, and salt. Set aside.

Next, separate the egg yolks from the egg whites. *If you have a stand mixer, you can start beating your egg whites while you prepare the rest of the batter (or just beat them later with a hand mixer). Beat egg whites until they form peaks. Reserve for later.

In a separate bowl, add the egg yolks, milk, pumpkin, melted butter, and vanilla. Mix until combined. Add the dry mixture slowly until incorporated using a mixer.

If you haven't already, take the egg whites and beat with a mixer until they form peaks. Fold beaten egg whites gently into the pumpkin batter. Spray waffle iron with cooking spray. Pour batter into waffle iron and cook according to waffle iron instructions. Makes around 8 Belgian waffles.

Pumpkin Butter

I originally made this for the Pumpkin Yogurt Cheesecake Cups, but I am so glad I did. It is yummy on Cinnamon Raisin toast, delicious mixed into Waffle and Pancake batter, I'm even thinking of adding it to my yogurt with a little gronola as a snack tomorrow, or maybe even adding it to my oatmeal. There are so many tastey ideas.

Pumpkin Butter


Servings: 14 • Serving Size: 1/4 cup • Old Points: 1.5 pts • Points+: 3 pts
Calories: 88.2 • Fat: 0.3 g • Protein: 1.0 g • Carb: 27.3 g • Fiber: 2.5 g

Ingredients:
By Skinny Taste
3 1/2 cups pumpkin puree, or 1 (29 ounce) can (not pumpkin pie filling)
2 tsp vanilla extract
3/4 cup apple cider or juice
1 cup packed brown sugar
2-3 cinnamon sticks
1-2 tsp pumpkin pie spice (to taste)

Directions:
Combine pureed pumpkin, vanilla, apple juice, spices, cinnamon sticks and sugar in a large saucepan; stir well. Bring mixture to a boilReduce heat, and simmer for 30 - 40 minutes or until thickened. Stir frequently. Adjust spices to your taste. 

Pumpkin Turkey Chili in Bread Bowls

Fall is officially here and with Thanksgiving just around the corner I am full Pumpkin mode! Over the top- Pumpkin Everything! By the time I went to the grocery store I had EIGHT recipes that called for Pumpkin. I had a awesome pumpkin filled weekend. First up, Pumpkin Yogurt Cheesecake Cups , second is:


Pumpkin Turkey Chili
in Bread Bowls

You HAVE to try this, it was amazing! Super easy to make! My husband had to ask me twice what was for dinner because he did not believe what I said the first time. He was apprehensive, but he was very impressed with the outcome. He said, "WOW, you did a great job honey, that was very good!" 


What you'll need:

·                     cooking spray (I use Olive Oil spray)
·                     2 lb 99% lean ground turkey
·                     1 small onion, chopped
·                     3 garlic cloves, minced
·                     1 tsp chili powder, to taste
·                     2 bay leaves
·                     2 tsp cumin
·                     1 tsp oregano
·                     2 (15 oz cans) of white northern or navy beans, rinsed and drained
·                     15 oz can pumpkin puree (not pumpkin pie filling)
·                     4.5 oz canned chopped green chile
·                     2 cups low sodium, fat free chicken broth
·                     fat free sour cream for topping (optional)
·                     chopped cilantro and chives for topping (optional)
·                     salt and pepper to taste

To Make:
Heat a large heavy saute pan over high heat and lightly spray with oil. Cook meat, salt, pepper onion, and garlic, breaking into small peices. I like to use my Pampered Chef Mix n Chop, add in chili powder, cumin and oregano and saute another 3 mins. Add 
to crock pot. Add beans, pumpkin puree, green chilies, and broth. Stir together. Place bay leaves on top. Cover and cook on high for 4 hours or low for 8 hours.
Remove bay leaves and adjust seasoning to taste before serving. Enjoy!

Bread Bowls

These were so much easier than I thought they would be. All you need is one can of Pillsbury's refrigerated Crusty French Loaf, 4 custard cups or ramekins, a cookie sheet and some cooking spray.   


To Make: 
Preheat oven to 400. Place the custard cups or ramekins upside down on the cookie sheet and spray with cooking spray. Cut the loaf into 4 equal sections. Roll each section into a 6" circle. Place each circle onto cups and shape to fit, dough should not touch cookie sheet. Bake 11 to 13 mins. Allow bowls to cool 5 mins before removing from cups. Ladle your soup of choice into each bread bowl. 


Monday, November 14, 2011

An Apple for Teacher

I am so grateful to know Miss Diana, the director at my boy's school. She is an amazing woman and teacher, and that's an understatement! She has been director of this school for 20 years and she cares for each and every one of the children as if they were her own. She is the most caring, generous, faithful, kind-hearted, loving person I know. My kids get excited when it's time to go to school and see Miss Diana, and so do I! Her generosity knows no limits, she even shares her favorite apples with my boys! That is selflessness, to give up something that you love for someone else you care for. My boys really enjoy the special treats from her, and time with her. So I decided to make some very special muffins just for her, using her favorite apples.

Honeycrisp Apple Strudel Muffins


What you'll need:
Muffins:
2 cups all-purpose flour
1 tsp baking powder
1/2 tsp baking soda
1/2 tsp salt
1/2 c (1 stick) butter, softened
1 c white sugar
2 eggs
1 1/4 tsp vanilla
1 1/2 c honeycrisp apples

Strudel topping:
1/3 c light brown sugar
1 tblsp all-purpose flour
1/4 tsp cinnamon
1 tblsp butter

To Make:
Preheat oven to 375. Grease or line 12 muffin cups.
In a medium bowl, mix flour, baking powder, baking soda and salt.
In large bowl, beat together butter and sugar. Add eggs until smooth. Mix in vanilla. Stir in apples, and gradually blend in the flour mixture. Spoon into prepared muffin cups.
In a small bowl, mix brown sugar, flour and cinnamon. Cut in butter until crumbly. Sprinkle over tops of muffin mixture in cups.
Bake 20 mins or until the center is set and a toothpick comes out clean. Allow muffins to cool in pan 5 mins, then cool completely on wire rack.


The boys were super excited to give all the muffins to Miss Diana, they even fought over who was going to carry them into school! It sure does make it a lot easier to be a working mom when you know that your children are in good, loving hands! Miss Diana has put her stamp of approval on these muffins, and so has my husband. He came home this evening looking for them. Sorry honey.

Sunday, November 13, 2011

My Challenge & My Guilt Free Treat

THE CHALLENGE- I challenged myself to no sweets until Thanksgiving Day. I started this challenge on Monday, November 7th, after consuming WAY too much candy the week after Halloween!. That will be a total of 17 days without sweets. This doesn't seem like a long time, and it isn't. The holidays are such a wonderful time of family, giving, and food. LARGE quantities of food! I find it very hard to stay focused on my goals when I have a 5 lb bucket of candy from Halloween staring at me every time I open the pantry, and when these yummy looking treats magically appear at work! I decided that if I simply told myself that I'm not allowed to have any sweets at all until Thanksgiving Day it would make it easier to stay focused, I started by planning my workouts for the remainder of the month, and then I shared what I was doing , so that my friends would help hold me accountable. Now, I am further commiting to this challenge by posting it up here, on my blog. All that said it has been 6 days, 6 days of eating healthy, staying under my calorie goal and working out everyday. I feel great and am looking forward to the next 10 days. I enjoyed day 7 with a little treat, no it's not technically a sweet! These little cups were fabulous, my mom and husband agree. Try them yourself, I promise you won't feel guilty, unless you eat them all at once.

Pumpkin Swirl Cheesecake Yogurt Cups
(mind didn't turn out so pretty, but they were tastey!)


Recipe from: Skinny Taste - an awesome new website I found. I'm sure you will be seeing many more posts from here!
I will rationalize every ingredient for you, just in case you need it!
You'll need:
  • 12 reduced fat vanilla wafers- ok first of you are using the reduced fat ones, secondly it's a wafer! not a cookie!
  • 8 oz 1/3 less fat cream cheese- cream cheese is used for cooking and to put on bagels, that is why it is not classified as a "sweet"! and the 1/3 less fat cream cheese is the only kind I use
  • 1/4 c sugar - ok that's the same amount of sugar that I put in my spaghetti sauce, so a "cooking" amount is acceptable
  • 1 tsp vanilla - I have no rationalization for this one, vanilla is really only used for baking sweets, but it's only 1 tsp for a total of 12 cups!
  • 6 oz fat free Greek yogurt - no rationalization needed here! it's yogurt! Greek yogurt at that! good for you!
  • 2 large egg whites - again no explanation needed- good for you!
  • 1 tblsp flour - flour is used to make all sorts of non-sweet things!
  • 3/4 c Pumpkin Butter or pumpkin pie filling. I made the pumpkin butter and will post it up soon, I promise! and rationaliztion- it's pumpkin, that's a vegetable!
Ok so now to make this yummy healthy snack!
Heat oven to 350. Line cupcake tin with liners. Place a vanilla wafer at the bottom of each liner. Gently beat cream cheese, sugar and vanilla until smooth. Gradually beat in yogurt, egg whites and flour. Pour into cupake liners, filling halfway. Top each with 1 tblsp of the pumpkin butter. Swirl with a toothpick to make a marbling effect. Bake 25 mins or until center is almost set. Cool to room temperature and then chill a few hours before serving.

Enjoy!

Oh and just in case you're wondering, one cheesecake cup has 114 calories, 5g fat, 2g fiber, 4g protien, and 7 sugars!

Friday, November 11, 2011

Thai Chicken

I LOVE spicy food. I haven't always, but ever since my pregnancy with my youngest, Caleb, I have really enjoyed new foods, spicy ones! Here's a good recipe for you, that has a little kick, but is still kid friendly.

Thai Chicken


What you'll need: 
1 package boneless-skinless chicken, cut up
3/4c Italian dressing, divided
2tblsp Crunchy Peanut Butter
2tblsp Honey
2tblsp Soy Sauce
1/4tsp crushed red pepper
1 bag (8oz) sugar snap or snow peas
8oz whole wheat linguine or thin spaghetti

To Make:
Cook pasta according to package. 
While that is cooking, cook the chicken and 1/4c dressing in a large skillet on medium to high heat until chicken is cooked through. Add peas, cover skillet with lid and cook for appox 5 mins, until peas are tender. 
Mix the remaining 1/2c dressing, peanut butter, honey, soy sauce and crushed red pepper together in a small bowl until well blended. 
Remove skillet from heat, add dressing mixture and toss lightly. Serve over pasta. 

Tuesday, November 8, 2011

Dinner - Done! (finally)

I have been somewhat disappointed this last week in dinner. I tried CrockPot Chicken Lasagna Florentine, and it burned. I tried Roasted Vegetable Enchiladas and the corn tortillas were too soggy. I tried Pork with Chive & Onion sauce and the meat wasn't fully cooked. I was about ready to stop and pick up some fast food, but the 30 day No Fast Food challenge I'm doing kept me from that! Good thing too, because tonight I conquered dinner!! My husband gave me "two thums up!" and said I'm allowed to keep cooking, we'll see what's next...

Mediterranean Chicken & Mushroom Skillet


What you'll need:
olive oil spray
1 package boneless skinless chicken breast
salt & pepper
1lb sliced fresh mushrooms
1 small onion, chopped
1/2c chicken broth
1 clove garlic, minced
1/2 tsp thyme
1/2c Feta cheese, crumbled
1 tsp parsley
1c cooked brown rice

To Make:
Cook the chicken breast in a large nonstick skillet sprayed with the olive oil cooking spray, seasoned with a little salt & pepper. Cook the chicken on both sides until browned and cooked through. Remove the chicken from the skillet and cover to keep warm. Add mushrooms and onion to skillet, cook approx 10mins, stirring occasionally. Add broth, garlic and thyme and cook 5 mins. Top chicken with mushroom mixture, sprinkle with cheese and parsley. Serve with cooked rice.


Red Wine + Chocolate = Amazing Cupcakes

The title just says it all, I'm not even going to attempt to try to add any more description to these, just try them!

Red Wine Chocolate Cupcakes


What you'll need
Cupcakes:
1c all-purpose flour
6tblsp unsweetened cocoa powder
3/8 tsp baking soda
1/4 tsp salt
3/4c + 2tblsp sugar
1 large egg
1/2 tsp vanilla
1/2c + 2tblsp red wine - I used Cupcake brand's Red Velvet, I highly recommend it for this recipe and for your drinking pleasure
1/4c or so of milk chocolate chips

Icing:
3tblsp butter
4tblsp cocoa powder
1 1/3c powdered sugar
3tblsp milk
1/4 tsp red wine

Preheat oven to 350. Line 12 cupcake tins with paper liners. Mix the flour, cocoa powder, baking soda and salt together, set aside. Beat together butter and sugar until fluffy, beat in egg and vanilla. Alternately fold in the dry ingredients and the red wine. Stir in chocolate chips, batter will be thick. Divide batter among the cupcake tins and bake for 20 mins. Let cool.
Prepare frosting by mixing together butter, cocoa powder, and sugar. Stir in milk. Beat until light and fluffy, beat in red wine. Frost cupcakes and sprinkle with a few more chocolate chips, if you desire, I did!

The red wine flavor of these cupcakes was very rich, the cake was dense, the icing was creamy, and the little chocolate chips were the perfect finishing touch. I think next time I try these I will try using dark cocoa powder, and there will be a next time, soon!


Friday, November 4, 2011

Enjoy a Thanksgiving favorite all year round!

My favorite dish at Thanksgiving is the green bean casserole. I love it so much that I decided to add some chicken to it and call it dinner and we make it all year round! It hits the dinner table once a month, for sure! I made it last night and we finished the entire dish in one sitting!

Chicken Green Bean Casserole


What you'll need: 
1 package boneless/skinless chicken, cut cup
2 cans Cream of Mushroom soup
3-4 cans green beans; drained, I like to mix the Italian cut and Kitchen cut green beans
3/4c milk
1 can water chestnuts; drained
salt and pepper to taste, I also added some garlic powder and minced onion
1 large can of French's Fried Onions

To Make: 
Preheat oven to 375. Mix the first 6 ingredients and 1/2 of the onions together in a 3qt casserole dish. I used my Pampered Chef Deep Covered Baker, just because I love it! Bake for approx 35mins, then add the remaining onions on top and bake an additional 10mins.